Arepa de Maíz
Warm water into masarepa, a short knead, a rest, then a plancha until the disk wears toasted leopard spots. Colombian arepas are simple corn disks with butter, cheese, hogao or egg — not stuffed Venezuelan pockets, and not a sandwich you hide the corn inside.
- Prep
- 30 min
- Cook
- 10 min
- Serves
- 6–8 arepas, about 10–12 cm / 4–4¾ in across
- Difficulty
- Easy
Researched · Kitchen testing pending
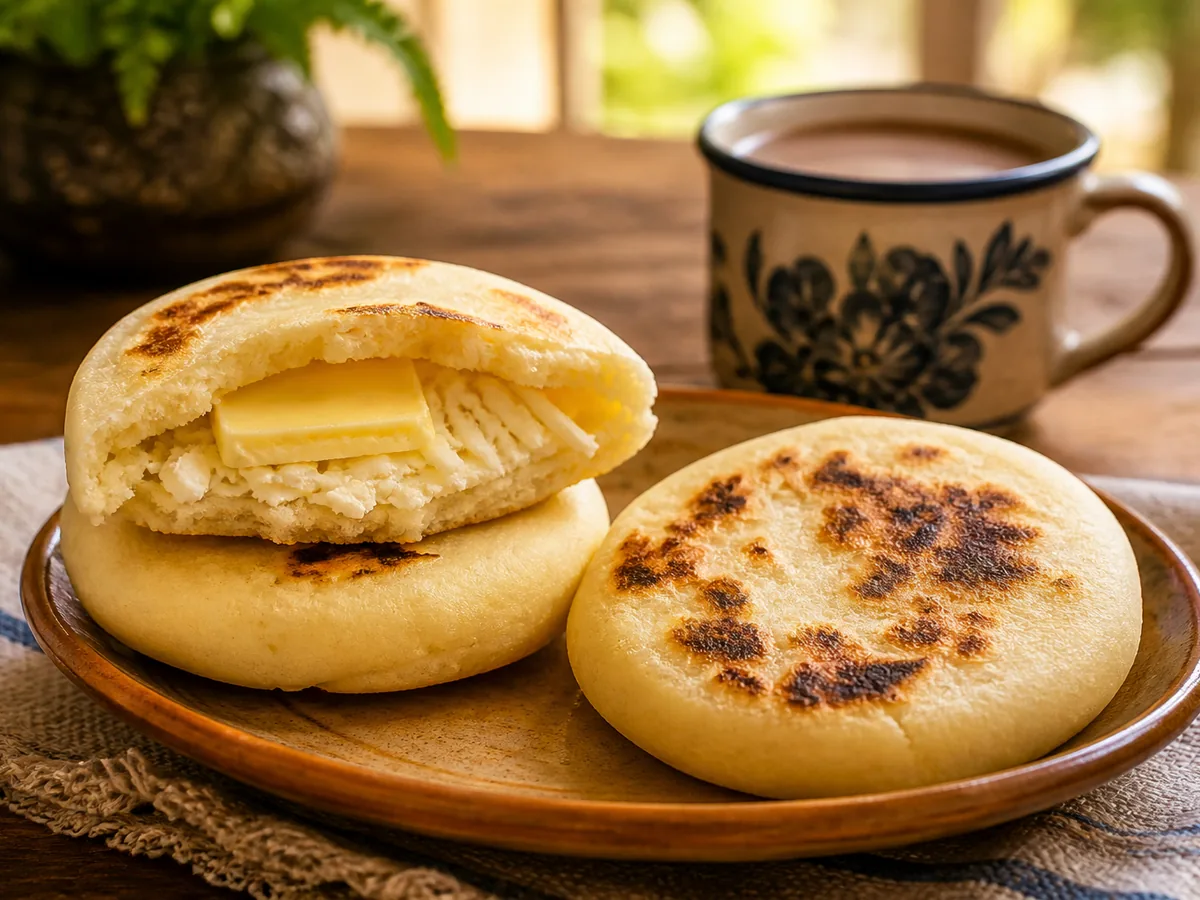
Warm water into masarepa is not a dump — it is a short knead that decides whether you get a soft, toast-spotted disk or a cracked hockey puck with a gummy centre.
Colombian arepas are flatter, and often thicker, than the stuffed Venezuelan style people picture first. They cook on a plancha or dry skillet for breakfast, or as a starch beside soup, then open just enough for cheese, hogao, butter or a fried egg.
Pull the arepa when the second side shows honest toasted freckles and the centre has set — not when the cheese on the counter has already been unwrapped for ten minutes. Corn waits for heat; the fillings wait for corn.
Masa
- 240 g2 cupsPrecooked white or yellow cornmeal — masarepa, harina precocidaP.A.N., Goya Masarepa or similar; not raw corn flour, and not masa harina for tortillas
- 240–280 ml1–1¼ cupsWarm water, about 40–45 °C / 104–113 °Fstart at 1:1 by volume and adjust by feel
- 6 g1 tspFine sea salt
- 15 g1 TbspUnsalted butter, or 15 ml / 1 Tbsp neutral oiloptional, worked into the dough for tenderness
- 30 g2 TbspGrated mozzarella or queso costeño, mixed into the masaoptional, for a cheese arepa base
For cooking
- Neutral oil, or a thin butter film for the plancha if it sticks — many well-seasoned pans need almost nothing
Hogao (enough for this batch)
- 1 small1 smallWhite or red onion, finely dicedabout 100 g / 3½ oz
- 22Ripe tomatoes, finely dicedabout 250 g / 9 oz; shake off the watery seeds if very juicy
- 15 ml1 TbspNeutral oil or lard
- 2 g⅓ tspFine saltplus more to taste
- Pinch of ground cumin
- 10 g2 Tbsp loosely packedCilantro leaves, chopped
- Optional — 1 scallion thinly sliced, and 1 small garlic clove minced
Classic finishes
- Soft butter, for spreading while hot
- 120–150 g4–5 ozMelting cheese, slicedmozzarella, queso doble crema, or a mild white melting cheese
- Optional — fried or scrambled eggs, one per person; sliced avocado with lime and salt; crumbled fresh cheese
Why masarepa hydrates differently than raw corn
Precooked cornmeal has already been cooked and dried. Warm water rehydrates the starch granules, salt seasons through the dough, and a short rest lets the exterior moisture travel inward so the disk cooks evenly. Too little water and the rim cracks as it expands on heat; too much and the centre steams into a dense, gummy paste while the surface browns. The target feel is soft play-dough: moist and cohesive, not sticky to dry hands, not crumbly when you press an edge.
White or yellow, thick or thin
White masarepa tastes cleaner and milder; yellow brings a slightly sweeter, more toasted corn note. Both are Colombian home staples. Antioquia-style arepas often run thicker and denser for splitting with butter or cheese, while coastal versions sometimes go thinner and eat more like a toasted flatbread. About 1–1.5 cm (⅜–⅝ in) thick after pressing splits the difference. This is not a Venezuelan stuffed-pocket project — keep the corn visible.
Passive time, counted separately
The dough rests 5–10 minutes after mixing so the masarepa fully hydrates. That rest is hands-off and sits outside the times quoted above, and it is the difference between cracked edges and a sealed rim.
Equipment
- Wide mixing bowl
- Cast-iron skillet, griddle or plancha
- Thin spatula
- Small skillet for the hogao
- Damp cloth or plastic wrap
- Clean kitchen towel, for holding the finished arepas
Method
On the dough — timed method10–12 min
Put the masarepa and salt in a wide bowl and whisk, so the salt is not a pocket at the bottom.
Pour in 240 ml (1 cup) warm water in a steady stream while stirring with a fork or your fingers, adding the optional butter or oil. Mix until no dry flour shows, 1–2 minutes. The bowl should look shaggy, then come together.
Knead in the bowl 2–3 minutes. Squeeze a handful: it should hold a smooth ball without cracks. If the surface fissures when you squeeze, wet your hands and work in water 15 ml (1 Tbsp) at a time; if it sticks aggressively to your palms, dust in a teaspoon of dry masarepa. Feel beats the printed cup line.
If you are adding grated cheese to the masa, knead it in now so it distributes without tearing the disk later.
Cover with a damp cloth, or plastic wrap pressed to the surface, and rest 5–10 minutes.
Divide into 6–8 equal pieces, about 70–85 g (2½–3 oz) each, and roll each into a smooth ball between dry palms. Flatten between your palms, or under plastic wrap, into disks 10–12 cm (4–4¾ in) wide and 1–1.5 cm (⅜–⅝ in) thick. Press from the centre out so the middle is not thicker than the rim, and smooth any edge cracks with a wet fingertip before they hit the pan — heat locks them in permanently.
Mix masarepa and salt with 240 ml (1 cup) water at 40–45 °C / 104–113 °F and optional fat for 1–2 minutes. Knead 2–3 minutes; correct cracks with 15 ml (1 Tbsp) water or stickiness with a teaspoon masarepa. Knead in optional cheese. Cover and rest 5–10 minutes. Divide into 6–8 portions of 70–85 g (2½–3 oz); press evenly into disks 10–12 cm (4–4¾ in) wide and 1–1.5 cm (⅜–⅝ in) thick. Smooth cracked edges with a wet fingertip.
On the plancha — toast without burning8–12 min
Heat a cast-iron skillet, griddle or plancha over medium heat for 3–4 minutes. The surface should be hot enough that a drop of water skitters, roughly 180–200 °C / 355–390 °F — not smoking black. Too cool and the arepa dries before it colours; too hot and you get bitter black freckles over a raw centre.
Place the disks on the dry, or barely oiled, surface without crowding. Cook undisturbed 4–6 minutes on the first side: you want patchy golden-brown toasted spots, a firm set rim, and a soft but not wet centre when you press gently. If the spots go dark brown in under 3 minutes, drop to medium-low immediately.
Flip with a thin spatula and cook the second side another 4–6 minutes. Total pan time is usually 8–12 minutes. A quiet hiss is fine; aggressive smoking means the fat or crumbs are burning.
For thicker Antioquia-style disks: once both sides have colour, stand the arepa on its edge and roll it around the pan for 30–60 seconds so the rim sets, or finish 3–5 minutes on a rack in a 180 °C / 350 °F oven if the centre still feels doughy.
Done feel: exterior dry and toasted, interior hot and set like a soft cooked corn cake rather than shiny paste. Crack one open as a test — steam should puff out and the crumb should look cooked through, with the centre typically around 90–95 °C / 194–203 °F. Hold the finished arepas wrapped in a clean kitchen towel so they steam-soften slightly instead of going leathery on a cold plate.
Preheat a dry or lightly oiled griddle 3–4 minutes to 180–200 °C / 355–390 °F. Cook uncrowded disks 4–6 minutes per side until golden; lower heat if dark before 3 minutes. Set thick rims for 30–60 seconds, or finish doughy centres 3–5 minutes at 180 °C / 350 °F. Check cooked centres at 90–95 °C / 194–203 °F; wrap in a towel.
On the hogao — sweet onion, ripe tomato12–15 min
Warm the oil in a small skillet over medium heat. Add the diced onion, and the scallion if using, with the salt. Cook 5–6 minutes, stirring, until translucent and sweet-smelling with the edges just turning gold — not brown-bitter.
Add the garlic if using and stir 30–60 seconds. Add the tomato and the pinch of cumin, and cook 8–10 minutes, stirring often, until the mixture turns jammy and most of the free liquid has cooked off. Raw tomato water makes a soggy arepa.
Pull it off the heat and stir in the cilantro. Taste: you want savoury-sweet onion, bright tomato acidity, and enough salt to wake the mild corn. If it tastes flat, a pinch more salt; if dull-sweet, a few drops of lime. Keep it warm.
Soften onion, optional scallion and salt in oil over medium heat 5–6 minutes. Add optional garlic for 30–60 seconds, then tomato and cumin for 8–10 minutes until jammy. Off heat, add cilantro; adjust salt or lime and keep warm.
On the fillings — Colombian, not stuffed-pocket theatre
Butter: split the hot arepa horizontally with a knife, leaving a hinge if you like, and smear soft butter so it melts into the crumb.
Cheese: tuck sliced melting cheese into the split and return it to the warm pan for 30–60 seconds with the lid on, or wrap it briefly in foil, so it softens without turning the arepa greasy. Coastal tables lean hard on cheese; still, do not drown the corn.
Hogao: spoon it into the split arepa, or serve it in a bowl for dipping. Tomato acidity and onion sweetness balance the Maillard bitterness on the well-toasted spots.
Egg: fry sunny-side or scramble softly, then slide it into the split with cheese or hogao. If you are holding leftover filled arepas, reheat the egg to steaming hot, at least 74 °C / 165 °F.
Taste the assembled bite. Bland corn means more salt in the next dough, or a pinch on the butter. Flat overall wants lime on avocado, or hogao with more tomato. Too rich wants fresh cilantro and avocado for green lift. Burnt-bitter crust means lower heat next round — lean on the sweet hogao this round.
Split hot arepas and add butter, hogao, cheese or cooked eggs. Melt cheese in a covered warm pan 30–60 seconds. Reheat leftover egg fillings to at least 74 °C / 165 °F. Taste and balance with salt, lime, cilantro or avocado.
Plate it
Stack the arepas in a cloth-lined basket so they stay warm and soft, with butter, cheese and a bowl of hogao on the table. People build their own.
A Colombian breakfast plate might be arepa, hogao, egg, avocado and café tinto; at lunch the same arepa sits beside sancocho or frijoles instead of becoming a stuffed showpiece.
Leave space on the plate — the disk is the starch, not a sandwich you hide.
Keep arepas warm and soft in a cloth-lined basket. Set out butter, cheese and hogao for everyone to add; serve with eggs, avocado and coffee for breakfast, or alongside sancocho or beans.
Sensory checkpoints and temperatures
- Water for the dough: warm at 40–45 °C / 104–113 °F, hot-tap warm rather than boiling. Boiling water makes sticky, pasty masa.
- Dough before the rest: a smooth ball with no dry cracks when squeezed hard.
- Dough after the rest: slightly softer, easier to press without fissures.
- Pan: medium, giving toasted leopard spots in 4–6 minutes a side, not black in 2.
- Done arepa: firm rim, set hot centre around 90–95 °C / 194–203 °F, a corn-toasted smell, and no raw flour taste in the middle.
- Hogao: jammy and savoury-sweet, not watery, with the cilantro bright at the end.
- Sound and feel: a quiet toast hiss, and a finger press that springs back slightly without leaving wet dough on the skin.
Use warm water at 40–45 °C / 104–113 °F, never boiling. Check dough is smooth and crack-free, and arepas have toasted spots, firm rims and cooked centres at 90–95 °C / 194–203 °F. Hogao should be jammy, without watery tomato liquid.
Storing it
Cooked arepas keep in an airtight bag in the fridge at or below 4 °C / 40 °F for up to 3 days. Reheat on a medium skillet 2–3 minutes per side, or wrap in a damp towel and microwave 30–45 seconds, then crisp them briefly on the pan so they do not stay soggy. Freeze cooked arepas up to 1 month, separated by parchment; thaw in the fridge and re-toast.
Raw dough can rest covered up to 1 hour at cool room temperature; longer and it dries, so re-wet your hands and knead briefly. Refrigerated tightly covered it holds up to 4 hours — bring it back toward room temperature before shaping. Do not leave egg- or cheese-filled arepas at room temperature more than 2 hours. Hogao keeps refrigerated 3–4 days; reheat until simmering hot.
Troubleshooting
- Dry, cracked edges.
Under-hydrated dough, or the rest was skipped. Wet your hands, knead in water a tablespoon at a time, rest 5 minutes, and smooth the rims before cooking. Cracks that appear only in the pan usually started as dry dough.
- A gummy, dense centre.
Too much water, disks too thick, or heat so high the outside browned before the inside set. Press thinner, closer to 1 cm (⅜ in), cook on medium rather than high, and finish in a warm oven if needed. This is a hydration-and-heat problem, not a salt problem.
- A hard, dry hockey puck.
Overcooked, dough too dry, or held uncovered too long. Shorten the time, hydrate the next batch more, towel-wrap after cooking, and serve with butter.
- It sticks to the pan.
The pan was not hot enough at the start, or the dough was wet. Preheat fully, use a whisper of oil, and let the first crust set for two full minutes before nudging.
- Bland.
Salt the dough properly, about 1 tsp per 2 cups masarepa. Butter and hogao cannot fully rescue unsalted masa — fix the next mix.
- Bitter burnt spots.
Heat too aggressive, or sugar from added cheese scorched. Medium heat, patience, and flip when golden rather than black.
- Crumbly dough that will not form.
Wrong flour — tortilla masa harina or raw cornmeal — or an extremely dry brand. Buy flour labelled precooked masarepa, and add water gradually until the squeeze test passes.
- Raw centre, dark outside.
The classic high-heat failure. Lower the flame, extend the time, and oven-finish thick disks.
- It tastes like a Venezuelan stuffed arepa project.
You split and overloaded until the corn disappeared. Keep the fillings light, and let the toast and corn show.
Substitutions
Traditional core: masarepa, water and salt, cooked on a plancha or skillet until spotted, eaten with butter, cheese, hogao or egg. Regional thickness varies — Antioquia thicker and split-friendly, coastal tables often cheese-forward and sometimes thinner.
Accepted departures
A spoon of butter or oil in the dough. Grated cheese in the masa. An oven finish for thick disks. Yellow or white masarepa interchangeably. Store-bought hogao in a pinch, simmered briefly to wake it up.
Departures that are not this dish
Deep-fried arepa balls as the default breakfast. Huge pocket-stuffed Venezuelan arepas rebranded as Colombian. Wheat flour in the dough. Microwave-only "arepas" that never see a pan, where the texture dies. Sweet pancake syrup on the plate as if it were North American cornbread.
Scaling
For 2–3 people
Halve to 120 g (1 cup) masarepa and about 120–140 ml water. Same rest and cook times — the disks still need the full 4–6 minutes per side. Make a half batch of hogao, or keep the leftovers for eggs tomorrow.
For a crowd of 12–16 arepas
Double the dough and rest it in two covered bowls so the surface does not dry. Cook in batches and hold the finished arepas wrapped in a clean towel inside a low oven at 90 °C / 200 °F for up to 20 minutes. Do not stack them uncovered or they sweat and toughen. Shape all the disks before the first one hits the pan, so you are not rushing hydration while the plancha waits.
On scaling salt
Salt scales with flour, but water still adjusts by feel — humidity and brand shift hydration more than the maths does. Do not double the salt blindly if your cheese fillings are already salty.
What to serve it with
- Café tinto or hot chocolate, for breakfast
- Hogao and fresh or melting cheese, the default savoury partners
- Sancocho, frijoles or grilled meats, when the arepa is the starch
- Sliced avocado with a pinch of salt and lime
- Ají or hot sauce on the side, for heat without rewriting the dough
- Soft scrambled eggs, or a fried egg, for a full morning plate
Skip drowning them in mayonnaise-heavy spreads if you want the corn to stay the point.
Questions
White or yellow masarepa?
Both work. White is milder and classic for many inland breakfasts; yellow tastes a bit toastier. Do not reach for Mexican masa harina by accident — different grind, different behaviour, different dish.
Can I use cold water?
You can, but warm water hydrates faster and more evenly. Cold water often needs a longer rest, 10–15 minutes, and more kneading to erase dry cores.
Why not stuff them like Venezuelan arepas?
Different tradition. Colombian home arepas are usually simpler disks with toppings, or a light split fill. Stuffing until the corn vanishes is another plate with another name.
How do I keep them soft for a party?
Towel wrap, low oven hold, and fill just before eating. Air is the enemy. Refresh on a hot plancha 30–60 seconds a side if they cooled.
Can I make the dough ahead overnight?
It is possible refrigerated and tightly covered, but the surface dries and the texture tightens. Better to mix the morning of, or cook ahead and re-toast. If you must hold it overnight, press plastic directly onto the surface and knead with wet hands before shaping.
Are they gluten-free?
Plain masarepa arepas are naturally gluten-free if your brand is pure corn. Watch flavoured mixes, and shared fryers elsewhere in the meal.
My brand needs more water than 1:1.
Normal. Start at 1:1 by volume, then add by the tablespoon until the squeeze test passes. Coastal humidity and aged open bags both change the number.
Butter in the dough, or only on top?
Either. In-dough butter softens the crumb; on-top butter is the classic hot finish. A little of both suits a breakfast plate.
Can I cook them in an air fryer?
You can finish or reheat there, but the plancha's direct contact is what builds the toasted spots. Treat air-fryer-only as a departure.