Coxinha
A broth-and-potato dough cooked to real plasticity, wrapped around shredded chicken, pinched into a drumstick and fried. It succeeds or fails in the five minutes after the broth hits the flour.
- Prep
- 1 hr 45 min
- Cook
- 25 min
- Serves
- About 24 medium coxinhas
- Difficulty
- Hard
Researched · Kitchen testing pending
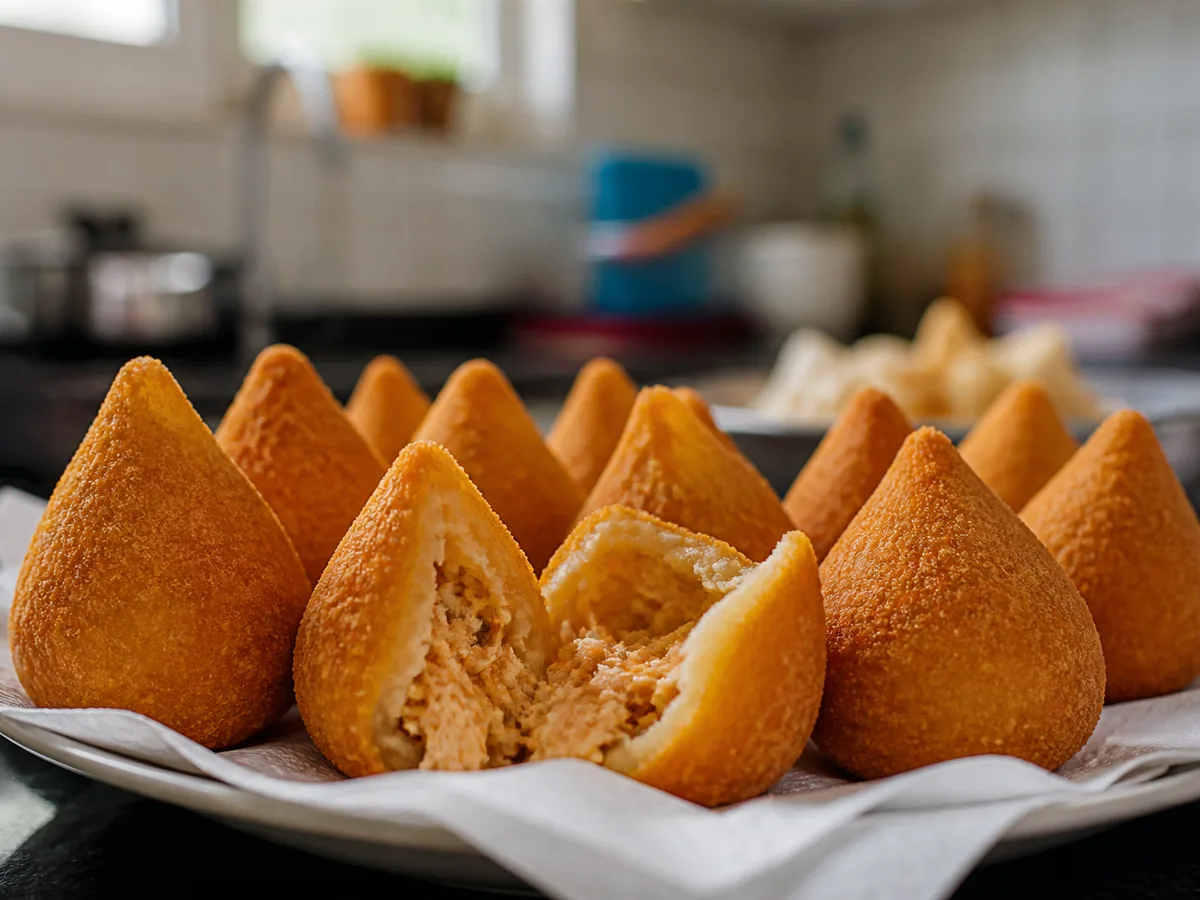
The dough for coxinha fails or succeeds in the first five minutes after the broth hits the flour and mashed potato. When that paste turns from a sticky slurry into something that peels cleanly from the pot and stretches without tearing, you have plasticity worth shaping.
Everything after that — filling temperature, sealing technique, breading sequence, oil that holds 175–180 °C — is maintenance of what the dough already promised.
Get plasticity and oil temperature right and the drumstick shape stops being decoration and starts being structure.
Chicken and broth
- 700 g1½ lbBone-in chicken thighs, skin on or off
- 1.2 L5 cupsWater, or enough to cover
- 1 small1 smallOnion, halved
- 2 cloves2 clovesGarlic, smashed
- 1 leaf1 leafBay leaf
- 1 tsp1 tspFine salt, plus more to taste
- ½ tsp½ tspBlack peppercorns
The filling
- 2 tbsp2 tbspNeutral oil or butter
- 100 g1 smallOnion, finely diced
- 2 cloves2 clovesGarlic, minced
- 2 tbsp2 tbspTomato paste
- 80 ml⅓ cupReserved chicken broth
- 2 tbsp2 tbspFlat-leaf parsley, finely chopped
- 1 tbsp1 tbspScallion, green part, finely chopped
- 50 g1¾ ozCream cheese or requeijão, softenedoptional — a common home-kitchen departure, and I label it as one
The dough (massa)
- 400 g14 ozStarchy potatoes, peeled and cut into chunksRusset or similar
- 500 ml2 cups plus 2 tbspStrained chicken broth, hotfrom the poach above — keep it below a simmer, but never let it go cold
- 300 g2½ cupsAll-purpose flourplus a little for dusting
- 30 g2 tbspUnsalted butter
- 1 tsp1 tspFine salt
- a pincha pinchTurmeric, or a scrape of annatto oiloptional, for colour
Breading and frying
- 2 large2 largeEggs, beaten with 1 tbsp water
- 200 g2 cupsFine dry breadcrumbsor panko crushed finer
- 1.5–2 L6–8 cupsNeutral high-smoke-point oilsoybean, canola or peanut — enough for 5–6 cm / 2–2½ in of depth in a heavy pot
The size matters
Street-food sized, about 60–70 g / 2–2½ oz each before frying. Not oversized bar snacks. Coxinha is not a chicken nugget with nostalgia attached. The drumstick silhouette, the thin elastic shell that stays tender after frying, and a moist filling held in by a sealed tip are the entire point.
The clock
About 1 hour 45 minutes of active work, plus 45 minutes chilling the dough and 20 minutes chilling the shaped pieces, plus 20 to 25 minutes of frying in batches. Roughly three hours end to end.
Shred finely, not coarsely
You want long thin shreds that pack into a drumstick tip without leaving air pockets. Coarse chunks rupture the shell when you squeeze it.
Season the filling harder than feels right
A notch more assertive than you think. The dough around it is deliberately mild, and it will mute whatever you put inside.
Equipment
- A pot for poaching the chicken, and a sieve
- A wide, heavy pot for the dough — the mass gets stiff and fights back
- A sturdy wooden spoon or silicone spatula
- A potato masher
- A heavy pot for frying, and a thermometer
- A wire rack over a sheet pan
- Trays lined with parchment
The thermometer is not optional. Oil temperature is the second half of this recipe, and eyeballing it is how coxinhas come out pale and greasy.
Method
Poach the chicken, and keep the broth35 min
Thighs into a pot with the water, halved onion, smashed garlic, bay leaf, 1 tsp salt and the peppercorns. Bring to a boil, then drop to a steady simmer and skim the foam for the first 5 minutes.
Simmer 25 to 30 minutes, until the meat pulls easily from the bone. The broth should smell clean and chicken-forward, not muddy.
Lift the chicken out. Strain the broth and discard the solids. You need at least 500 ml of clear broth for the dough, plus a splash for the filling. Keep it hot.
When the meat is cool enough to handle, about 10 minutes, shred it finely with two forks or your fingers. Discard skin, bone and gristle.
Boil thighs with water, onion, garlic, bay, 1 tsp salt and peppercorns; skim 5 minutes, then simmer 25–30 minutes until meat releases from bone. Strain broth; keep at least 500 ml for dough plus 80 ml for filling hot. Cool chicken about 10 minutes, then shred finely, discarding skin, bones and gristle.
The filling12 min
Warm the oil or butter over medium. Soften the diced onion 4 to 5 minutes until translucent and sweet-smelling, not browned. Garlic for 45 to 60 seconds until fragrant.
Tomato paste in, 1 to 2 minutes, until it darkens slightly and loses its raw metallic edge. Then the shredded chicken and 80 ml of broth. Cook 3 to 4 minutes, stirring, until it looks moist but not soupy — a spoon dragged through should leave a brief trail.
Off the heat, fold in the parsley, scallion, and the cream cheese if you are using it. Taste and season assertively.
Cool it completely before shaping. Warm filling steams the dough from the inside and weakens every seal.
Soften onion in oil or butter over medium 4–5 minutes without browning. Add garlic 45–60 seconds, tomato paste 1–2 minutes, then chicken and 80 ml broth 3–4 minutes until moist, not soupy. Off heat, fold in herbs and optional cheese; season assertively and cool completely.
Mash, dry, and build the dough25 min
Boil the potato in salted water 12 to 15 minutes, until a knife slips through with no resistance. Drain thoroughly, then return the chunks to the hot dry pot for 1 minute over low heat to drive off surface moisture — wet potato makes slack dough.
Mash until completely smooth. Lumps become weak spots when you stretch the shell. You should have about 300–320 g.
In a wide heavy pot over medium heat, bring together the hot broth, butter, salt and optional colour. When the butter melts and the liquid steams, stir in the mashed potato until uniform.
Boil potatoes in salted water 12–15 minutes until fully tender. Drain, dry in the pot over low heat 1 minute, and mash smooth, yielding about 300–320 g. Heat broth, butter, salt and optional colouring over medium; when steaming, stir in potatoes until uniform.
The flour goes in all at once — this is the moment5–8 min
All the flour, in one go, and start stirring immediately with a sturdy spoon. Work continuously.
For the first minute or two it looks lumpy and sticky. Keep going. Around minute 3 or 4 it pulls away from the sides and becomes a single mass that leaves a thin film on the bottom of the pot. Cook another 1 to 2 minutes, turning the mass, to drive off the raw flour taste.
What you are after: soft play-dough that stretches when pulled — not bread dough that snaps.
Dry and cracking: splash in 1–2 tbsp hot broth and knead it in off the heat. Still gluey after 5 or 6 minutes: the potato was too wet or the broth ran high — dust with 1–2 tbsp flour and cook a minute more.
Add flour all at once and stir continuously. Once dough pulls from the sides after 3–4 minutes, turn and cook 1–2 minutes more until elastic. For cracks, knead in 1–2 tbsp hot broth off heat; if still gluey after 5–6 minutes, add 1–2 tbsp flour and cook another minute.
Chill the dough45 min
Tip it onto a lightly oiled plate or board and press plastic wrap directly onto the surface so no skin forms.
Chill 45 minutes, until cool enough to handle comfortably and firm enough to shape. Do not skip this — hot dough tears and seals badly.
Transfer dough to a lightly oiled plate or board and press plastic wrap against its surface. Chill 45 minutes until comfortable to handle and firm enough to shape without tearing.
Shape and seal30–35 min
Set up a board, a small bowl of water for your fingertips, and a parchment-lined tray. Portion the dough into 24 balls of about 40–45 g, keeping what you are not using covered.
One at a time: flatten a ball into a disc 8–9 cm across, thicker in the middle than at the edges — about 6–7 mm in the centre, tapering out. Cup it in your non-dominant hand and place a heaping tablespoon, 15–18 g, of cooled filling in the centre. Do not overfill; greed here causes blowouts in the oil.
Bring the edges up and around, pinching firmly at the top into a teardrop. Rotate as you pinch so the seal is spiral-tight rather than one weak crease. The tip should be pointed but not needle-thin — a fragile spike burns before the body cooks.
Smooth the body with damp fingertips until no seams show. Thin spots fry darker and leak. If the dough softens as you work, chill the tray for 10 minutes mid-batch.
Make 24 covered dough balls of 40–45 g. Flatten each to 8–9 cm, with a 6–7 mm centre and thinner edges; fill with 15–18 g cold filling. Rotate and pinch into sealed teardrops; smooth with damp fingers, avoiding thin tips. Chill 10 minutes if softening.
Chill again, then bread20 min chill, 10 min breading
Twenty minutes in the fridge, unbreaded. Cold pieces hold their silhouette in hot oil and bread more cleanly.
Then: beaten egg in one shallow bowl, breadcrumbs in another. Roll each coxinha in egg, let the excess drip, and coat thoroughly in crumbs, pressing gently — especially at the tip. For a thicker crust, repeat egg and crumbs once.
Fry soon, or refrigerate up to 4 hours: uncovered for the first hour, then loosely covered.
Refrigerate unbreaded pieces 20 minutes. Dip in egg beaten with 1 tbsp water, drain excess and press into fine breadcrumbs, especially at tips; repeat for thicker crust. Fry soon or refrigerate up to 4 hours, uncovered for the first hour, then loosely covered.
Fry, with the thermometer in charge20–25 min in batches
Heat the oil to 175–180 °C / 347–356 °F.
Below 165 °C / 329 °F the coating drinks oil and the shell turns pale and greasy. Above 190 °C / 374 °F the crust browns before the dough sets and the tip scorches.
The oil drops when cold pieces go in, so do not crowd — 4 to 6 at a time depending on the pot, and let it recover between batches.
Fry 4 to 5 minutes, turning once, until deep golden and crisp when tapped with a spider. Listen for a steady moderate sizzle; frantic sputtering means surface water or oil that is too hot.
Drain on a wire rack, not on paper towels alone — steam softens the underside. Rest 3 to 4 minutes before serving. The filling is molten.
Heat 5–6 cm / 2–2½ in oil to 175–180 °C / 347–356 °F. Fry 4–6 pieces per batch for 4–5 minutes, turning once, until deep golden and crisp; let oil recover between batches. Drain on a rack and rest 3–4 minutes: filling is very hot. Avoid temperatures below 165 °C / 329 °F or above 190 °C / 374 °F: the coating becomes greasy or browns before the dough sets.
Checkpoints, and why each one matters
The dough, after cooking
Matte, cohesive, peeling from the pot. Glossy stickiness means undercooked flour or too much moisture.
The filling
Moist threads that clump lightly when squeezed, not a wet hash. Excess liquid migrates into the dough during the chill and the fry.
A shaped piece, before breading
Smooth, sealed at the tip, no filling peeking out. Any leak becomes a steam vent that splits the shell.
The oil
Shimmering, barely smoking at the very top of the range if at all. The thermometer beats visual guesswork every time.
The finished coxinha
A shatter-thin crust, a tender elastic shell beneath it, and filling that stays put when you bite the tip.
Storing it
Shaped but not fried
Breaded, on a tray in the fridge up to 24 hours, then bagged. Or freeze on a tray until solid and bag for up to 1 month. Fry from frozen at 170–175 °C / 338–347 °F, adding 1 to 2 minutes. Do not thaw first.
Fried
Best within 2 hours. Reheat on a rack at 180 °C / 350 °F for 8 to 10 minutes to re-crisp. The microwave softens the crust — use it only if you accept that. For a party, hold them on a rack in a 95 °C / 200 °F oven up to 30 minutes. Longer and the crust dulls.
Components
Leftover dough keeps 1 day refrigerated, wrapped tight; bring it toward room temperature before shaping. Leftover filling keeps 2 days — but do not freeze it if you added cream cheese, as the texture suffers.
Troubleshooting
- The dough cracks as you shape it.
Too dry, or chilled too hard. Knead in a tablespoon of hot broth and let it sit 10 minutes at room temperature.
- The dough sticks to your hands.
Too warm or too wet. Chill 15 minutes and dust your hands lightly with flour.
- Filling leaks out in the oil.
A weak seal or too much filling. Pinch harder, use less, and chill the shaped pieces before frying.
- Greasy, pale crust.
The oil was too cool. Bring it back to 175 °C and fry smaller batches so it can hold there.
- Dark outside, doughy inside.
Oil too hot, or the pieces too large. Drop to 175 °C, make them smaller, and extend the fry by 30 to 60 seconds.
- The tip burns.
The point is too thin, or the oil is at the top of the range. Blunt the tip slightly and watch the temperature.
- Bland all through.
An underseasoned filling or a weak broth. Salt the filling harder, and reduce the broth longer next time for concentration.
- The dough tastes raw.
It needed more time on the heat after the flour went in. Cook until it leaves that film on the pot and the pasty smell is gone.
Substitutions
Traditional — boteco and street
A dough of broth thickened with flour, often with potato and sometimes without; a compact drumstick shape; breaded once; deep-fried. The filling is shredded chicken with onion, garlic and herbs, with tomato paste varying by region and by cook.
Departures I use, and label
A spoon of requeijão or cream cheese in the filling for creaminess. A double breadcrumb coat for extra crunch. A pinch of turmeric in the dough for a warmer colour. Baking at 220 °C / 425 °F from frozen after a spray of oil: acceptable for leftovers, never as good as a proper fry. I do not call air-fried or oven-only versions the same thing. They are cousins.
What I will not blur
Coxinha is not a sphere, not a nugget, and not a thick breaded football of paste. The plasticity of the dough, a sealed tip, and oil in the right band are the identity of the thing.
Other fillings
Bar variants exist — shrimp, cheese, carne seca — but at that point it is a croquette in coxinha shape. For this recipe's frame, chicken is the baseline.
Scaling
The dough is the bottleneck, not the frying. It has to be worked hot and fast, and a bigger mass fights the spoon harder.
Half batch
Halves cleanly, about 12 coxinhas. Use a narrower pot for the massa so the broth does not spread thin and cool before the flour goes in.
Double batch
Cook the dough in two pots, not one. A double mass in a single pot cooks unevenly and stiffens at the edges before the centre catches up. Shape and fry in the same rhythm regardless — the fryer sets the pace, and the oil needs to recover between batches either way.
What to serve it with
Standing up, from a napkin, ideally still slightly too hot.
- A cold beer, or guaraná for the under-agers
- Hot sauce on the side for anyone who wants it
- A plate of other festa food — brigadeiro and pão de queijo belong here too
These are a snack, not a plated course. Nobody eats coxinha with cutlery.
Questions
Can I use chicken breast instead of thighs?
You can, but thighs stay juicier through shredding and simmering. With breast, do not overcook the poach, and moisten the filling with an extra splash of broth.
Can I skip the potato?
Some recipes use flour and broth alone. Potato improves tenderness and plasticity. Without it, increase the flour slightly and expect a chewier shell — and cook the massa thoroughly.
What oil is traditional?
Neutral vegetable oil, for home and street alike. Olive oil is the wrong smoke point and the wrong flavour here.
Can this be made gluten-free?
A dedicated gluten-free blend can work in the dough with some testing, and the breadcrumbs must be gluten-free too. Expect less stretch and more fragility at the seal.
How far ahead can I make them?
Shape and bread them, then freeze. Frying from frozen is genuinely good, and it is how I do a party — no last-minute shaping with sticky hands.